
Spring Security
- Spring Security는 애플리케이션에 보안을 적용할 수 있도록 도와주는 프레임워크이다.
- 권한 부여는 사용자가 요청한 자원에 대한 접근을 허용하거나 거부하는 기능을 제공한다.
권한 부여(Authorization) 처리 흐름
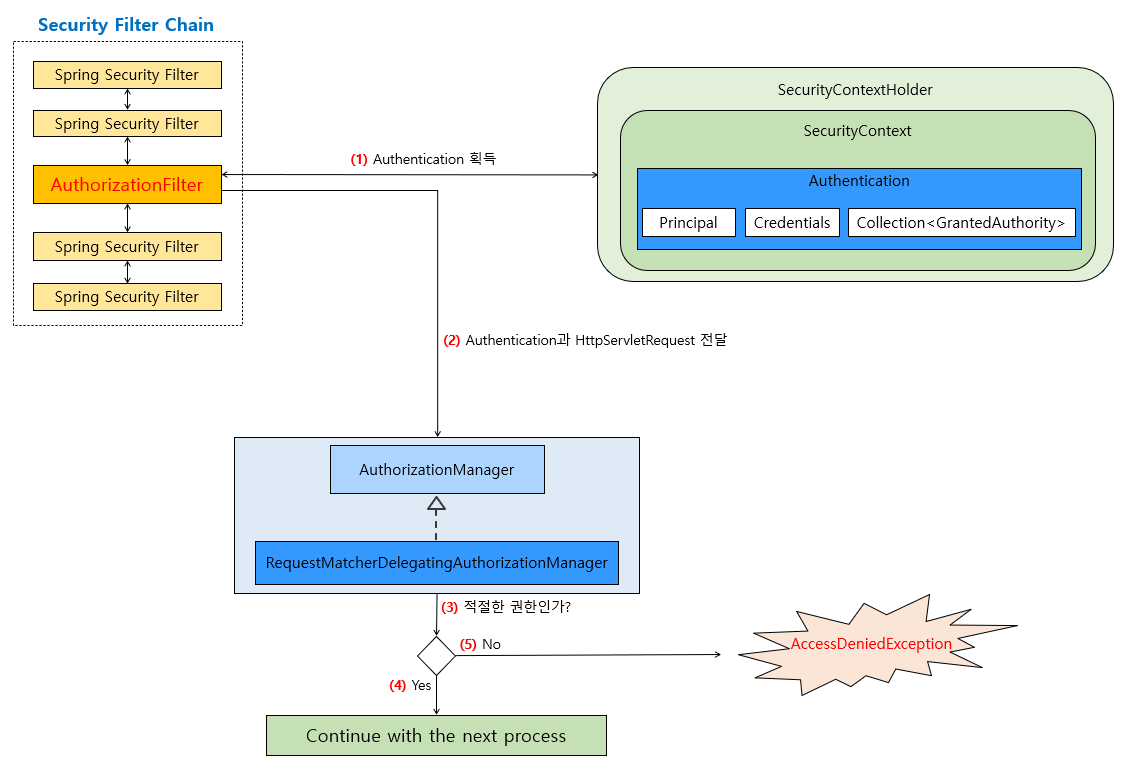
1. 권한 부여 기본 원리
- Spring Security는 권한 부여를 위해 사용자의 권한과 요청 자원의 권한을 비교한다.
- 사용자의 권한은 사용자가 로그인하면서 인증(Authentication) 과정에서 얻어지며, 요청 자원의 권한은 개발자가 설정해야 한다.
2. 사용자의 권한 설정
- 사용자의 권한은 'UserDetails' 인터페이스(Interface)의 구현 클래스(Class)를 이용해 설정할 수 있다.
- 일반적으로 'User' 클래스(Class)를 사용해 권한을 설정하며, 다음과 같이 생성할 수 있다.
Java
- 'roles' 메서드를 이용하여 사용자에게 권한을 부여할 수 있다.
- 권한은 여러 개 부여할 수 있으며, 각 권한은 접두사 'ROLE_'가 붙은 형태로 저장된다.
3. 자원에 대한 권한 설정
- 자원에 대한 권한은 HttpSecurity 객체(Object)를 사용하여 설정할 수 있다.
- authorizeRequests() 메서드(Method)를 이용해 다양한 권한 설정을 적용할 수 있다.
Java
-
위의 예시에서
/admin/**경로에 대한 접근은 ADMIN 권한을 가진 사용자만 허용하고,/user/**경로에 대한 접근은 USER 권한을 가진 사용자만 허용한다. -
authorizeHttpRequest() 랑 authorizeRequests()는 기능적 차이는 없으며 authorizeHttpRequest()가 자바 8 람다(lambda) 스타일로 코드를 작성한다는 차이만 있다.
4. 메서드 보안
- 메서드(Method) 수준에서 권한을 설정할 수도 있다.
- @PreAuthorize 어노테이션(Annotation)을 사용해 메서드 실행 전에 권한을 확인할 수 있다.
Java
- 위의 예시에서 deletePost() 메서드(Method)는 ADMIN 권한을 가진 사용자만 실행할 수 있다.
5. 접근 거부 처리
-
사용자가 권한이 없는 자원에 접근하려고 할 때, 접근 거부 처리를 구현할 수 있다.
-
Spring Security는 기본적으로 사용자가 권한이 없는 자원에 접근하려고 할 때, AccessDeniedException을 발생시키며 403 Forbidden 응답을 반환한다.
-
하지만 이러한 기본 동작을 사용자 지정으로 변경할 수 있다.
5-1. 접근 거부 페이지 설정
- HttpSecurity 객체(Object)를 사용하여 접근 거부 페이지를 설정할 수 있다.
- exceptionHandling() 메서드(Method)를 이용해 다음과 같이 설정할 수 있다.
Java
5-2. 접근 거부 핸들러 설정
- 커스텀 접근 거부 핸들러를 만들어 사용할 수도 있다.
- 먼저, AccessDeniedHandler 인터페이스(Interface)를 구현하는 클래스(Class)를 작성해야 한다.
Java
- 이제 작성한 CustomAccessDeniedHandler 클래스(Class)를 HttpSecurity 객체(Object)에 설정해야 한다.
Java
-
이렇게 설정하면, 사용자가 권한이 없는 자원에 접근하려고 할 때 CustomAccessDeniedHandler의 handle() 메서드(Method)가 호출되어 커스텀 로직을 실행할 수 있다.
-
이를 통해 보안 강화된 웹 애플리케이션을 구축할 수 있다.
추가
- 관리자 권한을 줄 때는, @Secured와 hasRole을 사용한다.
- 우선 Admin Controller 에 @Secured 어노테이션(Annotation)을 달아준다 ("ROLE_ADMIN")권한을 가진 사람만 접근할 수 있다는 뜻이다.
Java
- Admin Controller에 @Secured 를 하는 대신 Web Security Config 에 아래 코드를 넣어도 작동한다.
Java
- UserDetails 를 구현하는 클래스인 UserDetailsImpl 의 설정을 바꾼다.
- 먼저 상단에 다음과 같이 ROLE_PREFIX 를 멤버변수로 선언해준다.
- 현재 UserEntity 의 Column 은 ADMIN, USER 이런 식으로 되어있다.
- Spring Security는 “ROLE_” 형태로 인식하기 때문에, 데이터 형태를 바꿔줘야 한다.
Java
- Collection
<? extends GrantedAuthority>getAuthorities 는 계정이 갖고 있는 권한 목록 리턴하는 메서드다.
SimpleGrantedAuthority
-
Granted Authority를 implements한 클래스(Class)이다.
-
"basic concrete implementation of a GrantedAuthority stores a string representation of an authority granted to the authentication object" 권한을 string으로 변환해주는 것이 포인트이다.
Java
UsernamePasswordAuthenticationToken
-
Authentication 인터페이스(Interface)의 구현체다.
-
pricipal: 사용자 본인
-
credentials: 그에따른 자격을 뜻한다.
-
위에서 authority를 새로 생성하게 되는데, Entity의 USER/ADMIN 칼럼과는 별개로 ROLE_PREFIX 를 추가한 "ROLE_ADMIN"형태의 AUTHORITY 를 생성하고 추가해준다.
-
이미 userRole 이라는 칼럼에 admin/user 로 식별이 되어 있는상황이다.
-
그러니 credentials 가 들어갈 필요가 없다.
-
null이 들어가있다.
JwtAuthenticationFilter 코드
principal 에 해당하는 userdetails, 그리고 또 다른 권한인 authority 를 추가해서 usernamepassword authenticationtoken 을 생성해준다.
if (jwtTokenUtil.validateToken(authToken, userDetails)) { UsernamePasswordAuthenticationToken authentication = new UsernamePasswordAuthenticationToken(userDetails, null, userDetails.getAuthorities()); authentication.setDetails(new WebAuthenticationDetailsSource().buildDetails(req)); logger.info("authenticated user " + username + ", setting security context"); SecurityContextHolder.getContext().setAuthentication(authentication); }
<참고: 에러코드>
UsernamePasswordAuthenticationToken authentication = new UsernamePasswordAuthenticationToken(userDetails, null, Arrays.asList(new SimpleGrantedAuthority("ROLE_ADMIN")));
원래 getAuthorities 가 아닌 Arrays.asList(new SimpleGrantedAuthority("ROLE_ADMIN") 을 넣었었다. 이렇게 되면 모든 사용자의 롤에 ROLE_ADMIN 을 넣는 셈이 된다. UserRole 이 생성되어있으니 이를 활용해서 admin 과 user authority 를 구분해서 생성하자.